Cheesecake Stuffed Strawberries

 These aren't anything complicated. With five ingredients, they take only a few minutes to put together. In fact, these were probably the least time-intensive food at my Cheesecake Extravaganza. Yet, I had more than a few people come up and proclaim their love for the finger food.
You don't have to throw a cheesecake party to serve these....I imagine they'd be welcomed just about anytime! Another great party food, these can be made ahead of time. I did all the steps, even the sprinkling of graham cracker crumbs, twenty-four hours ahead of time and they suffered no ill consequences. Just be sure to wrap them well (I covered my plate with plastic wrap).
Cheesecake Stuffed Strawberries
from Nutmeg Nanny
Print this post
Ingredients:
-1 lb large strawberries
-8 oz. cream cheese, softened (can use 1/3 less fat)
-3-4 tbsp powdered sugar (4 tbsp for a sweeter filling)
-1 tsp vanilla extract
-graham cracker crumbs
Directions:
1. Rinse strawberries and cut around the top of the strawberry. Remove the top and clean out with a paring knife, if necessary (some may already be hollow inside). Prep all strawberries and set aside.
2. In a mixing bowl, beat cream cheese, powdered sugar, and vanilla until creamy. Add cream cheese mix to a piping bag or ziploc with the corner snipped off. Fill strawberries with cheesecake mixture. Once strawberries are filled, dip the top in graham cracker crumbs. If not serving immediately, refrigerate until serving.

These aren't anything complicated. With five ingredients, they take only a few minutes to put together. In fact, these were probably the least time-intensive food at my Cheesecake Extravaganza. Yet, I had more than a few people come up and proclaim their love for the finger food.
You don't have to throw a cheesecake party to serve these....I imagine they'd be welcomed just about anytime! Another great party food, these can be made ahead of time. I did all the steps, even the sprinkling of graham cracker crumbs, twenty-four hours ahead of time and they suffered no ill consequences. Just be sure to wrap them well (I covered my plate with plastic wrap).
You don't have to throw a cheesecake party to serve these....I imagine they'd be welcomed just about anytime! Another great party food, these can be made ahead of time. I did all the steps, even the sprinkling of graham cracker crumbs, twenty-four hours ahead of time and they suffered no ill consequences. Just be sure to wrap them well (I covered my plate with plastic wrap).
Cheesecake Stuffed Strawberries
from Nutmeg Nanny
Print this post
Ingredients:
-1 lb large strawberries
-8 oz. cream cheese, softened (can use 1/3 less fat)
-3-4 tbsp powdered sugar (4 tbsp for a sweeter filling)
-1 tsp vanilla extract
-graham cracker crumbs
Directions:
1. Rinse strawberries and cut around the top of the strawberry. Remove the top and clean out with a paring knife, if necessary (some may already be hollow inside). Prep all strawberries and set aside.
2. In a mixing bowl, beat cream cheese, powdered sugar, and vanilla until creamy. Add cream cheese mix to a piping bag or ziploc with the corner snipped off. Fill strawberries with cheesecake mixture. Once strawberries are filled, dip the top in graham cracker crumbs. If not serving immediately, refrigerate until serving.
from Nutmeg Nanny
Ingredients:
-1 lb large strawberries
-8 oz. cream cheese, softened (can use 1/3 less fat)
-3-4 tbsp powdered sugar (4 tbsp for a sweeter filling)
-1 tsp vanilla extract
-graham cracker crumbs
Directions:
1. Rinse strawberries and cut around the top of the strawberry. Remove the top and clean out with a paring knife, if necessary (some may already be hollow inside). Prep all strawberries and set aside.
2. In a mixing bowl, beat cream cheese, powdered sugar, and vanilla until creamy. Add cream cheese mix to a piping bag or ziploc with the corner snipped off. Fill strawberries with cheesecake mixture. Once strawberries are filled, dip the top in graham cracker crumbs. If not serving immediately, refrigerate until serving.
Chocolate Cupcakes with Butterfinger Icing

For the cupcakes, I baked Hershey’s perfectly chocolate cupcake recipe (my fav). But you can swap this out for your favorite recipe or just simply use a milk chocolate cake mix. But let’s talk about how to make that yummy orange swirl of Butterfingers icing goodness  .
Butterfinger icing – here’s what your going to need:
(printer friendly recipe available below)
Six full size butterfingers (plus some to cut up on top if you would like)
1 stick butter
1/2 cup peanut butter
1 cup powdered sugar
2-4 TBS milk
Step 1: Unwrap your candy bars. I was slightly disappointed every single bar I purchased was broken. Not that it matters…just saying!
.
Butterfinger icing – here’s what your going to need:
(printer friendly recipe available below)
Six full size butterfingers (plus some to cut up on top if you would like)
1 stick butter
1/2 cup peanut butter
1 cup powdered sugar
2-4 TBS milk
Step 1: Unwrap your candy bars. I was slightly disappointed every single bar I purchased was broken. Not that it matters…just saying!
 Step 2: Using a vegetable peelers, scrap the chocolate off the bars into a bowl, you will use the crumbles later on.
Something in side of me felt like I was committing some sort of dessert crime here. I mean who skins a candy bar of it’s chocolate? Don’t worry…it’s all for a good cause. It’s been well over 24 hours and nobody’s came knocking on my door yet! I think we’re safe…..
Step 2: Using a vegetable peelers, scrap the chocolate off the bars into a bowl, you will use the crumbles later on.
Something in side of me felt like I was committing some sort of dessert crime here. I mean who skins a candy bar of it’s chocolate? Don’t worry…it’s all for a good cause. It’s been well over 24 hours and nobody’s came knocking on my door yet! I think we’re safe…..
 Step 3: Finely crush the butterfingers., in a blender if possible, or placing them in a ziplock bag and rolling over with a rolling pin would work. Set aside.
 I stuck mine in my Ninja, they came out a perfect powdery butterfingers mixture!
 Step 4: In the bowl of an electric mixer, beat the butter until soft and creamy. Then add in peanut butter, mix until combined well.

 Step 5: Dump in the butterfingers crumbs. Mix until fully combined.
 Step 6: Slowly mix in powdered sugar.
As you can see we’ve lost the bright orange color of the butterfingers. Since looks are a good portion of the brains way to taste…I added in some orange coloring to help it return to the look of butterfingers. Totally optional…
Step 6: Slowly mix in powdered sugar.
As you can see we’ve lost the bright orange color of the butterfingers. Since looks are a good portion of the brains way to taste…I added in some orange coloring to help it return to the look of butterfingers. Totally optional…
 Step 7: Once all is mixed well and desired color is achieved add in 1 TBS of milk until you have reached the desired consistency. I used 2 in my icing, as always I like mine to be a bit stiff to hold up to my pipping habits!
Now that you’ve got your icing grab some cupcakes!
Step 7: Once all is mixed well and desired color is achieved add in 1 TBS of milk until you have reached the desired consistency. I used 2 in my icing, as always I like mine to be a bit stiff to hold up to my pipping habits!
Now that you’ve got your icing grab some cupcakes!
 After you’ve pipped on your icing hold the cupcake over your chocolate scrap bowl and load it up! Then top with chunks of Butterfinger bars if you would like! TIP: When cutting butterfingers bars lay the knife across the bar then firmly and quickly press down. If you try to slowly cut the bar..it’s going to crumb into pieces.
 And now you’ve got a incredibly yummy, habit worth breaking candy bar cupcake.

 And of course these crazy pretty greaseproof bright yellow cupcake liners came from Sweet’s and Treats boutique. They just wouldn’t be the same without them, don’t ya think?
Now I just have to decide what candy bar cupcake to make next…snickers? payday? Almond Joy? What do YOU want to see?
And of course these crazy pretty greaseproof bright yellow cupcake liners came from Sweet’s and Treats boutique. They just wouldn’t be the same without them, don’t ya think?
Now I just have to decide what candy bar cupcake to make next…snickers? payday? Almond Joy? What do YOU want to see?

. Summer Salmon Over Cilantro-Lime Rice with Kale

- 4 tbsp lime juice, separated
- 1 tsp dried cilantro
- 1 tbsp honey (21g)
- 2 salmon fillets
- About 1/2 lb raw kale chopped
- 3-4 scallions diced
- 2 cups of cooked brown rice (I use the 90 second bagged kind)
- About 1/4 cup fresh cilantro
- Kosher Salt
Pour the marinade over the salmon and let sit while preparing the rice.
Heat a non-stick skillet over medium heat and spray with non-stick cooking spray. add the kale, 1 tbsp of the lime juice and a pinch or two of salt. Cook for about a minute until wilting.
Add the scallions, brown rice, cilantro, remaining tbsp of lime juice and another pinch of salt. Combine everything well allowing the flavors to merge.
Heat a second skillet over medium-high heat and spray with non-stick cooking spray. Cook the salmon 2-3 minutes a side depending on thickness. After the first flip pour any leftover marinade over the fillets.
Serve the salmon over the rice with another veggie on the side. I went with broccoli. One veggie all three of us can agree on. ;)
No nutritional info on this one.. it’s 2 salmon servings, 3 rice servings and my brain just can’t handle it right now. lol According to my “Roni Math” I’d count the salmon and 1/3 of the rice as 9 points.
Oatmeal Pancakes
Ingredients:
6 egg whites
1 cup rolled oats, dry
1 cup cottage cheese
2 teaspoons sugar
1 teaspoon cinnamon
1 teaspoon vanilla
Instructions:
In a blender, blend all ingredients until smooth. Heat a griddle or large non-stick skillet over medium-low heat. Spray with non-stick cooking spray. For each pancake pour 1/4 cup of batter onto griddle. Flip when they start to bubble. Cook until golden brown. Repeat with remaining batches, spraying the griddle as needed. Makes about 10 pancakes.
Number of Servings: 3
Nutritional Info Per Serving:
181 Calories, 2.7g Fat, 10mg Cholesterol, 361mg Sodium, 20g Carbs, 2.8g Fiber
Easy Cheesy Chicken Casserole

Ingredients
3 to 4 cooked chicken breasts, chopped $16-oz. pkg. wide egg noodles, cooked
2 (10 3/4-oz.) cans cream of chicken soup
8-oz. pkg. shredded Cheddar cheese
8-oz. pkg. shredded mozzarella cheese
1 sleeve round buttery crackers, crushed
1/4 cup margarine, melted $
2 tablespoons poppy seed
Preparation
- Combine chicken, noodles, sour cream, soup and cheeses in a large bowl. Pour into a lightly greased 13"x9" baking dish. Mix together cracker crumbs and margarine; sprinkle over top. Sprinkle poppy seed over cracker crumbs. Bake at 350 degrees for 25 to 30 minutes or until crackers are crispy and golden and cheese is melted.
Mandy Wheeler, Ashland, KY, Gooseberry Patch Christmas Book 12, Gooseberry Patch
No Bake Oreo Truffles
 Photo from TwicebakedTwins.com
Makes approximately 4 dozen truffles (or maybe a little less, depending on how much of the filling you choose to sample)
1 pkg. (8 oz.) cream cheese, softened
1 pkg. (1 lb. 2 oz.) Oreos (You can also use a generic version to save a little cash; I've tried a few varieties, and they work just as well.)
2 pkg. (8 squares each) Baker's Semi-Sweet Chocolate, melted (You will most likely use closer to 1 1/2 packages. That's more chocolate for spatula-licking, right?)
1. Set aside 5 Oreos and throw the rest in a food processor until they are finely crumbled
2. Thorougly mix cookie crumbs with cream cheese.
3. Form crumb-and-cream-cheese mixture into balls, approximately 1-inch across each (but don't worry too much about being exact here. They will come out delicious no matter the size!) and place onto a cookie sheet that has previously been lined with wax paper.
4. For best results, pop the formed mixture into the fridge for at least 15 minutes to chill while you complete the next step. If you really don't have the time, the truffles will still taste delicious (so don't worry!), but they will be more difficult to handle and some of the coating with mix with the filling.
5. Melt the chocolate. There are many ways to do this. I don't have a double boiler, so I just throw my chocolate into a saucepan and heat it on low, stirring frequently, until it is completely melted.
6. Remove pot from heat.
7. Coat previously formed balls with chocolate and return to the lined cookie sheet.
8. Throw the remaining 5 cookies into the food processor.
9. Sprinkle some of those crumbs on top of the (still wet) truffles.
10. Refrigerate for one hour.
You are done! You are now free to package, freeze, and eat. (Of course, you were free to eat during the entire process.)
Variation: swap out regular Oreos for Golden Oreos (semi-sweet chocolate for white chocolate, if you like white chocolate). You will end up with a cheesecake-like truffle
From pinterests-foods.blogspot.com

Red potatoes cubed with skin left on, drizzle with extra virgin olive oil, coat with a package of zesty Italian dressing mix and stir to coat, add minced onion for flavor, salt and pepper to taste. Cook 400 degree oven for 45 minutes or until tender. Top with grated Parmesan cheese.
Crockpot Beef Chili with Beans
 |
| This small batch, basic ground beef and tomato chili with beans, made in the slow cooker. Can be doubled. |
Recipe: Crockpot Beef Chili with Beans
©From the Kitchen of Deep South Dish
Prep time: 15 min |Cook time: 5 hours | Yield: About 4 to 6 servings
Ingredients
Instructions
- 1 pound of ground beef
- 2 cloves of garlic, minced fine
- 2 tablespoons of chili powder
- 1 teaspoon cumin
- 1 (28 ounce) can of whole tomatoes, undrained but coarsely chopped
- 1 (16 ounce) red kidney beans, rinsed and well drained
- 1 cup of chopped onion
- Up to 1/4 cup chopped green chiles, jalapeno, habanero, scotch bonnet, or serrano peppers (depending on heat level desired)
- 2 tablespoons of tomato paste
- Pinch of dried oregano
- Kosher salt and freshly cracked black pepper, to taste
Brown the ground beef in a skillet, breaking up the meat as it cooks; drain if needed. Add the garlic toward the end and saute for just a few more minutes. Add the chili powder and cumin, stir to thoroughly coat; remove from heat and set aside. Add the chopped tomatoes to a 3-1/2 to 4 quart slow cooker. Add the beans, onion, chiles, tomato paste and oregano; stir to mix. Add in the meat mixture, stir well, cover and cook on low for 6 to 8 hours or high for 3 to 4 hours.
~Cook's Notes~
In terms of chili as a main dish, this is a small batch chili - okay to double for a larger slow cooker, however be mindful of the hot chilies. Use a lean (90/10) ground beef to make this Weight Watchers friendly. A total of 8 servings is about 2 Weight Watchers Points (old system) per serving, not including serving add-ins or garnish extras.
Serving ideas: Serve with a side of saltines, or over rice, pasta, or corn chips.
Garnishes: Greek yogurt, sour cream, green onion, shredded cheese, sliced avocados, crushed tortilla chips, corn chips, fried tortilla strips, oyster crackers, Goldfish crackers, hot sauce, additional sweet or red chopped onion, cilantro.
Source: http://deepsouthdish.com
Shamrock Cupcakes
Marbles and green food coloring! Simple as that. Easily turns ordinary cupcakes into shamrocks. The kid’s will love them. Bonus: After eating, they will avoid being pinched with all of that green food coloring around their mouth. Hop on over to Easy Cake Decorating for the instructions, as well as other cupcake ideas!

Dreamfields Summer Pasta Broccoli Salad…and a Contest!!

Summer Pasta Broccoli Salad
- 1 box Dreamfields Rotini
- 1 cup mayonnaise (light or regular)
- 1/4 cup red wine vinegar
- 1/4 cup sugar
- 3 cups chopped, raw broccoli (about 1-inch pieces)
- 1 cup shredded Cheddar cheese
- 1/2 cup roasted, unsalted sunflower seeds
- 1/2 cup crumbled, cooked bacon
- 1/4 cup diced red onion or sliced green onion
2. Meanwhile, for dressing, in small bowl, whisk together mayonnaise, vinegar and sugar; set aside.
3. Add broccoli, cheese, sunflower seeds, bacon and onion to pasta. Toss to combine. Add dressing; toss until coated. Refrigerate, covered, until chilled, at least 1 hour. Let stand at room temperature 15 minutes before serving.
Recipe courtesy of the Dreamfields Website. Click Here for Nutritional Information.
Crockpot Pizza Casserole

Cook time:
Total time:
Serves: 6
Ingredients
- 1 Box (16 oz) Spiral Pasta (uncooked but rinsed)
- 1 pound lean ground beef, turkey or chicken
- 1 onion, chopped
- 1 clove garlic, minced
- 1 green bell pepper, chopped
- 1 cup sliced pepperoni
- 32 ounces pasta sauce
- 1 cup water
- 1 cup shredded mozzarella cheese
Instructions
- Spray a Large Crockpot (6qt or larger) with non-stick spray
- In a medium skillet over medium-high heat, brown the ground beef or chicken or turkey with the onion, garlic, pepperoni and green bell pepper. Drain any excess fat.
- Rinse pasta and place in the crockpot with drained ground meat mix. Stir. Pour pasta sauce and 1 cup water over noodle mix.
- Top with shredded mozzarella.
- Cover and cook on low for 5-6 hours (no not lift the lid).
Double Chocolate Cake with Black Velvet Icing
Notes: I have made this recipe twice now. The first time I followed the instructions and used two used 10- by 2-inch round cake pans. It came out beautifully. For this post, I used an odd-sized pan (6- by 3-inch), because I love its shape, and I made a half recipe, though all of the batter did not fit in the pan. The original recipe, too, calls for making a chocolate ganache, which sounds heavenly, but I have always adored my grandmother’s chocolate glaze recipe — it’s called black velvet icing and it contains eggs, which is odd, but it’s so good — so that is the one I use. If you want to use Gourmet’s chocolate ganache, find it here.
for the cake:
3 ounces fine-quality semisweet chocolate
1 1/2 cups hot brewed coffee
3 cups sugar
2 1/2 cups all-purpose flour
1 1/2 cups unsweetened cocoa powder (not Dutch process)*
2 teaspoons baking soda
3/4 teaspoon baking powder
1 1/4 teaspoons salt
3 large eggs
3/4 cup vegetable oil
1 1/2 cups well-shaken buttermilk
3/4 teaspoon vanilla
* It turns out that the LCC unsweetened cocoa powder, which I used for this cake, is in fact Dutch processed…I can’t read fine print apparently. I suspect that Dutch-process cocoa (which contains less acid than natural cocoa powder) is OK to use in this recipe because of the large quantity of buttermilk (also an acid) — there needs to be an acid in recipes that call for baking soda because acid activates the baking soda. I did add a note above (at the end of the main entry) explaining the difference between Dutch-process and natural cocoa powders. That might help you make a decision, but I think with this recipe, either Dutch process or natural will work just fine.
for the black velvet icing:
4 oz semi-sweet chocolate
a heaping 1/4 cup of confectioners’ sugar
3 eggs, well beaten
4 tablespoons butter, room temperature
1. Preheat oven to 300°F. and grease pans. Line bottoms with rounds of parchment paper. Finely chop chocolate and in a bowl combine with hot coffee. Let mixture stand, stirring occasionally, until chocolate is melted and mixture is smooth.
2. Into a large bowl sift together sugar, flour, cocoa powder, baking soda, baking powder, and salt. In another large bowl with an electric mixer beat eggs until thickened slightly and lemon colored (about 3 minutes with a standing mixer or 5 minutes with a hand-held mixer). Slowly add oil, buttermilk, vanilla, and melted chocolate mixture to eggs, beating until combined well. Add sugar mixture and beat on medium speed until just combined. Divide batter between pans and bake in middle of oven until a tester inserted in center comes out clean, 1 hour to 1 hour and 10 minutes.
3. Meanwhile, make the icing: In a small saucepan over direct heat set on low, melt the chocolate. Stir in the confectioners’ sugar. Stir in the eggs — a flat bottomed whisk is good for this. (I use a whisk until the ingredients are blended and then switch to a heat-proof spatula.) Cook over low to medium-low until thick. Stir in the butter one tablespoon at a time. Set aside to cool. Transfer to a glass measuring cup with a spout for easy pouring or store in whatever vessel you wish.
4. Cool layers completely in pans on racks. (I removed mine after 10 minutes.) Run a thin knife around edges of pans and invert layers onto racks. Remove parchment paper and cool layers completely. Cake layers may be made 1 day ahead and kept, wrapped well in plastic wrap, at room temperature.
5. If you are making a layer cake, spread icing over one cake layer. Top layer with other cake layer. Pour icing on top of top layer and with an off-set spatula (if you have one) spread it all over the sides. Cake keeps, covered and chilled, 3 days. Bring cake to room temperature before serving. (I just keep mine at room temperature always…no space in the fridge.)
Fair Trade products are sold at more than 100,000 locations across the U.S.:

Both of these Fair Trade products from the Lake Champlain Chocolates company would make wonderful gifts for the holidays. They can be found at Whole Foods Market as well as online.


Easy Garlic Chicken

Ingredients:
Directions:
-
Preheat oven to 500°F and lightly grease a casserole dish.
-
In small sauté pan, sauté garlic with the oil until tender.
-
Remove from heat and stir in brown sugar.
-
Place chicken breasts in a prepared baking dish and cover with the garlic and brown sugar mixture.
-
Add salt and pepper to taste.
-
Bake uncovered for 15-30 minutes.
Baked Meatballs

Incredible Baked Meatballs. 1lb hamburger, 2 eggs, beaten with 1/2 cup milk, 1/2 cup grated Parmesan , 1 cup panko or bread crumbs, 1 small onion, minced, 2 cloves garlic, minced, 1/2 teaspoon oregano, 1 teaspoon salt, freshly ground pepper to taste, 1/4 cup minced fresh basil Mix all ingredients with hands. Form into golfball sized meatballs. Bake at 350 degrees for 30 minutes.
Bite Size Apple Pies: Crescent Rolls, butter, apple slices, cinnamon, and sugar.
Bite Size Apple Pies: Crescent Rolls, butter, apple slices, cinnamon, and sugar.
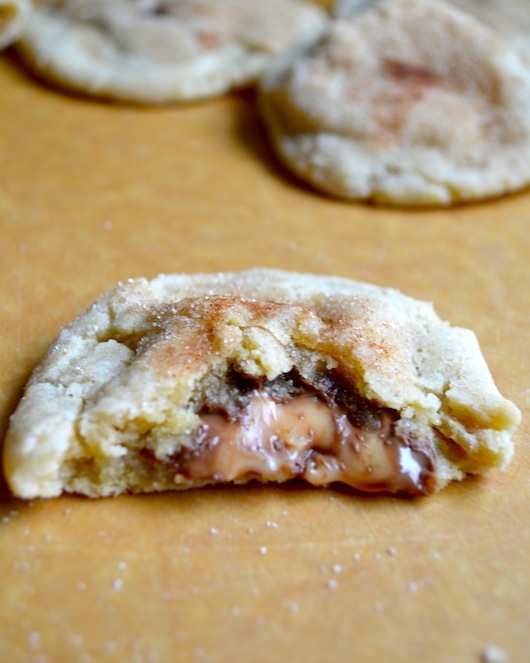
Rolo Stuffed Snickerdoodles
What is it about the simple deliciousness of snickerdoodles? Snickerdoodles = childhood. A caramel center is the perfect remix to this classic cookie. And Rolo’s are just the way to do it.
 Rolo Stuffed Snickerdoodles
Makes 32 cookies
1 batch store-bought or homemade perfect snickerdoodles
32 rolo candies
Preheat oven to 325 degrees. Flatten 1 tablespoon dough and wrap around Rolo candy. Roll into ball and set on cookie sheet.
 Bake for 14 minutes. Allow to cool thoroughly before attempting to remove from baking sheet.This is the littlest effort ever required for a seemingly gourmet cookie.
 Oh, and if you like these, then you’ll love The Secret to the Softest Chocolate Chip Cookies Ever, Sweet Slow Cooker Roasted Almonds, or the Homemade Donuts (with no donut pan!).

Makes 32 cookies
1 batch store-bought or homemade perfect snickerdoodles
32 rolo candies
Preheat oven to 325 degrees. Flatten 1 tablespoon dough and wrap around Rolo candy. Roll into ball and set on cookie sheet.

Macaroni and Beef with Cheese —
Childhood Love

Mid-week Macaroni and Beef with Cheese, photo by Donna
Simple Macaroni and Beef with Cheese
1 large onion, diced
1 tablespoon canola oil
salt to taste
optional seasonings: black pepper, oregano, cumin, coriander, chopped garlic, hot smoked paprika, chilli powder—whatever you’re in the mood for (I just used black pepper, garlic and a tablespoon of fish sauce, which gives it depth)
one 28-ounce can whole tomatoes, pureed in the can with a hand blender or in a blender blender
2 pounds lean ground beef
heat to low and cook fo
1 box macaroni
1 cup each grated cheddar and mozzarella cheeses
Sweat the onions in the oil with a three-fingered pinch of salt. Add the beef and cook it, breaking it up as you do. (Because my beef was very fatty, I cooked it separately and added it to the pot along with the tomatoes. Also an option, but uses an extra pan.) Add another three-fingered pinch of salt or two, along with any dry seasonings you want. Add the tomatoes and any fresh seasonings you may be using, bring to a simmer, then reduce the heat to low and cook for an hour.
Cook the macaroni in boiling water till it’s half done. Drain it and add it to the tomatoes. (I wanted this to stretch into two meals, so I used the whole box, but if you want your dish to be very tomatoey and beefy, you might want to add only half the macaroni). Stir it into the sauce. Taste it. Add more salt and other seasonings as needed, and cover. When it’s cooled and the pasta has absorbed the tomato juices, transfer it to a large baking dish and cover it with foil. It can sit out for several hours like this, be refrigerated for up to two days, or frozen a few weeks.
Bake it in a 400 degree oven till it’s piping hot (about 45 minutes if it’s cold to room temperature). Just before you’re ready to eat, remove the foil, cover macaroni with the cheese and broil till it looks beautiful.
Having used all the pasta, I put the second batch into the cleaned baking dish and covered it with foil, wrote “Mac and Beef, bake, cover with cheese and broil” on the foil with a sharpie—so that next time I’m gone, Donna has a mid-week meal ready to go.
Now that we have this frozen version, it begs the question, “What is the difference between pulling this homemade version and baking it, and cooking the ubiquitous store-bought kind?” Besides the fact that it’s more satisfying to serve from glass than from foil or plastic? Besides the good ingredients and lack of bad ones? Besides all that extra, gooey, delicious melted cheese? Besides that it was fun to make? Besides that it tastes better?
Love. It makes a difference.
1 cup each grated cheddar and mozzarella cheeses
Sweat the onions in the oil with a three-fingered pinch of salt. Add the beef and cook it, breaking it up as you do. (Because my beef was very fatty, I cooked it separately and added it to the pot along with the tomatoes. Also an option, but uses an extra pan.) Add another three-fingered pinch of salt or two, along with any dry seasonings you want. Add the tomatoes and any fresh seasonings you may be using, bring to a simmer, then reduce the heat to low and cook for an hour.

Cook the macaroni in boiling water till it’s half done. Drain it and add it to the tomatoes. (I wanted this to stretch into two meals, so I used the whole box, but if you want your dish to be very tomatoey and beefy, you might want to add only half the macaroni). Stir it into the sauce. Taste it. Add more salt and other seasonings as needed, and cover. When it’s cooled and the pasta has absorbed the tomato juices, transfer it to a large baking dish and cover it with foil. It can sit out for several hours like this, be refrigerated for up to two days, or frozen a few weeks.
Bake it in a 400 degree oven till it’s piping hot (about 45 minutes if it’s cold to room temperature). Just before you’re ready to eat, remove the foil, cover macaroni with the cheese and broil till it looks beautiful.
Having used all the pasta, I put the second batch into the cleaned baking dish and covered it with foil, wrote “Mac and Beef, bake, cover with cheese and broil” on the foil with a sharpie—so that next time I’m gone, Donna has a mid-week meal ready to go.
Now that we have this frozen version, it begs the question, “What is the difference between pulling this homemade version and baking it, and cooking the ubiquitous store-bought kind?” Besides the fact that it’s more satisfying to serve from glass than from foil or plastic? Besides the good ingredients and lack of bad ones? Besides all that extra, gooey, delicious melted cheese? Besides that it was fun to make? Besides that it tastes better?
Love. It makes a difference.
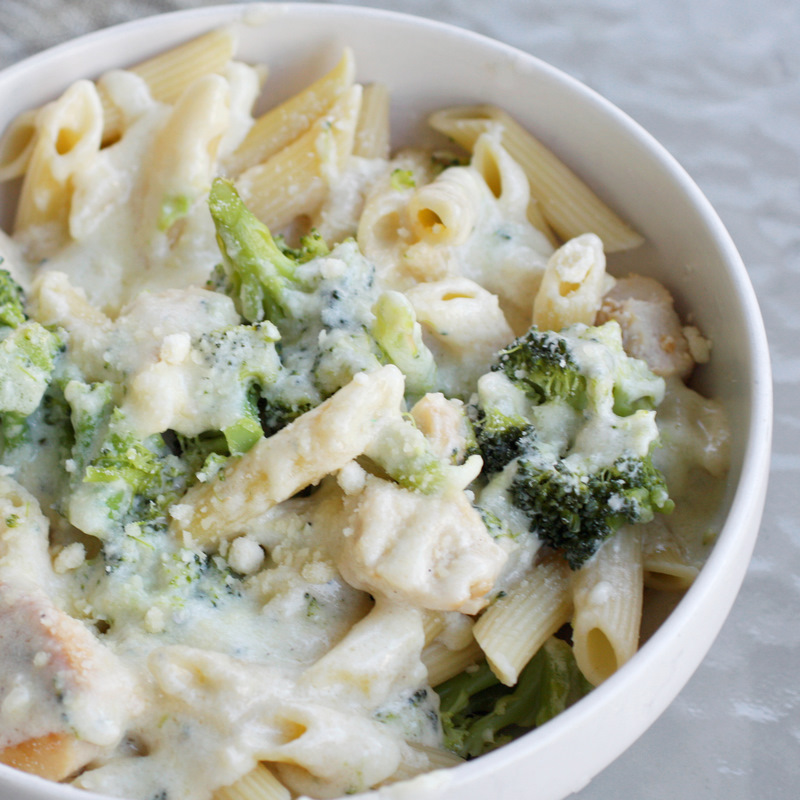
Chicken Broccoli Alfredo
Source: Heidi Clark
Ingredients:
2-3 cooked chicken breasts, diced1-2 cups fresh chopped broccoli, cooked and hot
fettuccine, cooked according to package directions. (I used penne because it’s what I had)
Alfredo Sauce:
1/2 cup (1 stick) butter
2 cups heavy cream
1/8 tsp. garlic powder
1/8 tsp. ground black pepper
1/2 teaspoon (1 clove) minced garlic
1/4 cup freshly grated Parmesan cheese
Instructions:
Cook chicken in method desired. I just cooked mine on the stove. Add chicken and broccoli to Alfredo sauce and heat through. Serve over hot, cooked fettuccine.
Melt butter in medium saucepan over medium heat. Add minced garlic with the butter. Add cream, garlic powder, and pepper. Simmer, uncovered, for 10 to 12 minutes or until thick, stirring frequently. Trust me, it will thicken. When sauce has reached desired consistency, stir in Parmesan cheese. Use for Chicken Broccoli Alfredo, or just serve as is over fettuccine. Serves 4-6.
No comments:
Post a Comment